Have you ever been interested in building your own temperature monitor?
Well by using an Arduino Uno, a LCD screen, a temperature sensor and a trimpot you can do just that and it’s not that hard, so read on.
The following picture shows the temperature monitor that I have built where you can clearly see the Arduino Uno board and the LCD screen but not the temperature sensor or the trimpot.

The components that I have used are:
- Arduino Uno Board
- Optrex DMC16230 LCD Module
- DS18B20 Digital temperature Module
- 10K Trim Potentiometer.
The following diagram is the schematic for this project.
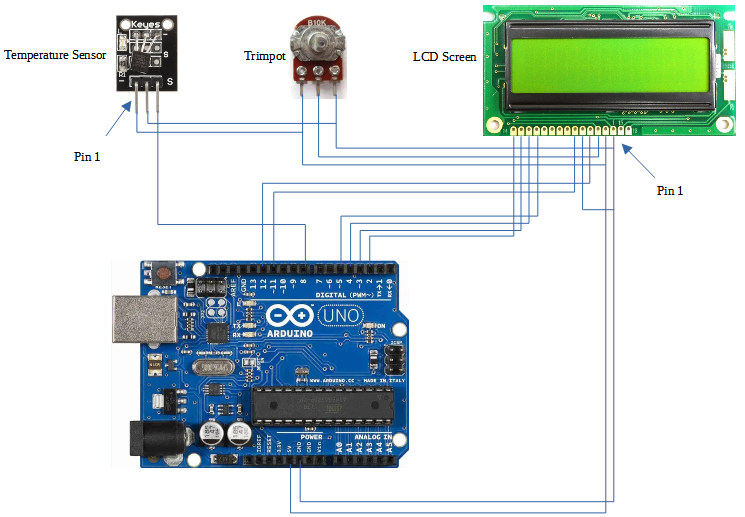
The following tables provide the connection details between the various modules.

Once the hardware side of things has been completed, it is time to focus on the software that is loaded into the Arduino UNO.
The sketch code for the temperature monitor is fairly simple as shown below.

To save you the effort of typing in the above code, simply download the ZIP file below that contains an INO sketch file and two sub folders for additional Arduino libraries that will need to be imported into the Arduino IDE for this project.
The following folders and file are contained within the ZIP file.

Copy the folders highlighted above to the following subfolder in the Arduino IDE installation folder.
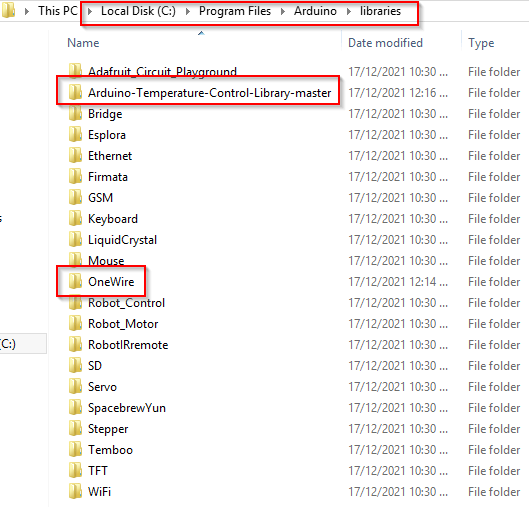
The OneWire subfolder contains the library code that is used to communicate with the temperature sensor which is a digital device that supports serial communications via the right most pin (see the above schematic).
The Arduino-Temperature-Control-Library-master subfolder contains the library code that handles the messaging layer of the communications with the temperature sensor using the OneWire library as the transport (or data) layer for the communications.
Finally, let’s take a closer look at the sketch code.
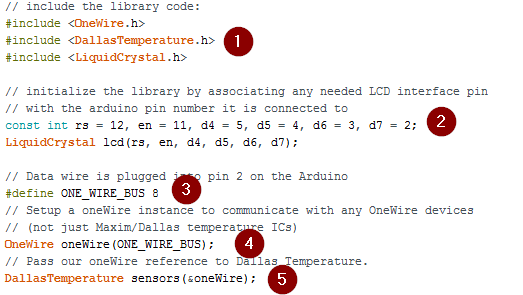
In the above code:
- The required libraries are referenced including the library for controlling the Liquid Crystal Display which is included with the Arduino IDE installation
- Access to the Liquid Crystal Display is initialised which is used to primarily define the functions of the pins on the Arduino UNO that control the LCD screen
- Defines the Arduino UNO pin that will be used to serially communicate with the temperature sensor
- The OneWire interface is initialised making reference to the Arduino UNO pin that will be used for the serial communications
- The temperature sensor interface is initialised making reference to the OneWire object that will be used to send and receive messages to and from the temperature sensor.
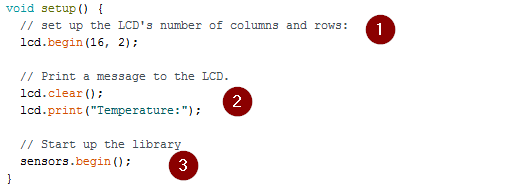
In the above code:
- The Liquid Crystal Display is set to show 16 characters on 2 separate lines
- The Liquid Crystal Display is cleared and the string “Temperature:” displayed
- The Arduino UNO connects with the temperature sensor.

In the above code:
- The current temperature is retrieved from the temperature sensor
- The display is cleared and the “Temperature:” label is displayed again
- The retrieved current temperature is displayed on the second line of the display
- And finally, there is a one second wait before reading and displaying the current temperature again which loops indefinitely.
That is pretty much it.
Compile and load the above sketch code into your Arduino UNO and you have your very own temperature monitor that displays the current temperature in degrees celcius.
