In the previous post, I provided an example of how you can develop a Dynamics 365 CRM Plugin without using Visual Studio.
In this post, I will now show you how to you can also develop a C# Console Application that connects with a Dataverse instance allowing you to Create, Read, Update and Delete data records again without needing Visual Studio.
Before we start, if you haven’t gone through the CRM Plugin with using Visual Studio blog post, you will need to perform the following two steps, the details of which are in the CRM Plugin blog post:
- Download and Install NuGet
- Download and Install .NET Framework V4.6.2 (or V 4.7.2)
The additional following steps to a develop this C# Console Application are:
- Create the Source Code Development Folders
- Compile the Source Code and Run the Console Application
Create the Source Code Development Folders
The following two sub folders and batch files will be needed to develop this console application.

Start by creating the Bin and Source sub folders under a development folder of your choice.
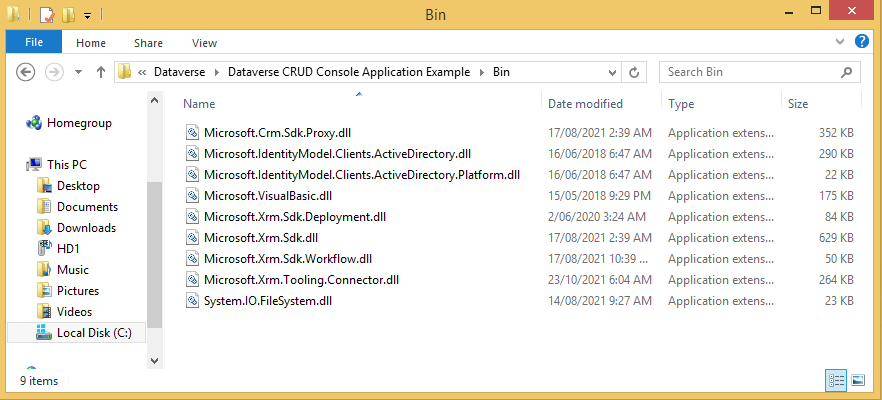
The Bin sub folder contains the DLLs shown below. Normally all DLLs would reside in a packages folder after running NuGet but to keep things simple, the DLLs will be located in the Bin subfolder where the executable for the Console Application will be located when the code is compiled.
Use the following command line instructions to get the required packages:
- nuget install Microsoft.CrmSdk.CoreAssemblies -OutputDirectory “<your directory>”
- nuget install System.IO.Filesystem -OutputDirectory “<your directory>”
Copy the DLL files shown above in the Bin sub folder from the Packages sub folder to the Bin sub folder that you have created.
The Source sub folder will need to contain the following C# source files.

Using a text editor, create the file AssemblyInfo.cs file using the code content below.
using System.Reflection;
using System.Runtime.CompilerServices;
using System.Runtime.InteropServices;

// General Information about an assembly is controlled through the following
// set of attributes. Change these attribute values to modify the information
// associated with an assembly.
[assembly: AssemblyTitle("Program")]
[assembly: AssemblyDescription("")]
[assembly: AssemblyConfiguration("")]
[assembly: AssemblyCompany("Atia Solutions")]
[assembly: AssemblyProduct("Program")]
[assembly: AssemblyCopyright("Copyright ©  2021")]
[assembly: AssemblyTrademark("")]
[assembly: AssemblyCulture("")]

// Setting ComVisible to false makes the types in this assembly not visible
// to COM components.  If you need to access a type in this assembly from
// COM, set the ComVisible attribute to true on that type.
[assembly: ComVisible(false)]

// The following GUID is for the ID of the typelib if this project is exposed to COM
[assembly: Guid("761e719a-d4e7-4c9e-af3e-7cfa176d316c")]

// Version information for an assembly consists of the following four values:
//
//      Major Version
//      Minor Version
//      Build Number
//      Revision
//
// You can specify all the values or you can default the Build and Revision Numbers
// by using the '*' as shown below:
// [assembly: AssemblyVersion("1.0.*")]
[assembly: AssemblyVersion("1.0.0.0")]
[assembly: AssemblyFileVersion("1.0.0.0")]
Next. create the file Program.exe.config file using the code content below.
<?xml version="1.0" encoding="utf-8"?>
<configuration>
  <appSettings>
    <add key="UserKey" value="CRM_Username" />
    <add key="UserPassword" value="CRM_Password" />
    <add key="Environment" value="https://CRM_DOMAIN.crm6.dynamics.com" />
  </appSettings>
  <startup>
    <supportedRuntime version="v4.0" sku=".NETFramework,Version=v4.7.2" />
  </startup>
  <runtime>
    <assemblyBinding xmlns="urn:schemas-microsoft-com:asm.v1">
      <dependentAssembly>
        <assemblyIdentity name="Newtonsoft.Json" publicKeyToken="30ad4fe6b2a6aeed" culture="neutral" />
        <bindingRedirect oldVersion="0.0.0.0-11.0.0.0" newVersion="11.0.0.0" />
      </dependentAssembly>
    </assemblyBinding>
    <assemblyBinding xmlns="urn:schemas-microsoft-com:asm.v1">
      <dependentAssembly>
        <assemblyIdentity name="System.Runtime.CompilerServices.Unsafe" publicKeyToken="b03f5f7f11d50a3a" culture="neutral" />
        <bindingRedirect oldVersion="0.0.0.0-5.0.0.0" newVersion="5.0.0.0" />
      </dependentAssembly>
    </assemblyBinding>
  </runtime>
</configuration>
Note that you will have to provide your own UserKey, UserPassword and Environment parameters.
Finally, create the file Program.cs file using the code content below.
using System;
using System.Collections.Generic;
using System.Linq;
using System.Text;
using System.Net;
using System.IO;
using System.Threading.Tasks;
using System.Diagnostics;
using System.Reflection;
using System.Configuration;
using System.Globalization;
using Microsoft.Xrm.Tooling.Connector;
using Microsoft.Xrm.Sdk;
using Microsoft.Xrm.Sdk.Query;
using Microsoft.Xrm.Sdk.Metadata;
using Microsoft.Xrm.Sdk.Client;
using Microsoft.Xrm.Sdk.Messages;

namespace Program
{
    class Execution
    {
        static void Main(string[] args)
        {
            Console.WriteLine("Dataverse CRUD Example Console Application Started!");
            try
            {

                //Step 1 - Retrieving CRM Essential Information.
                string strEnvironment = ConfigurationManager.AppSettings["Environment"].ToString();
                string strUserKey = ConfigurationManager.AppSettings["UserKey"].ToString();
                string strUserPassword = ConfigurationManager.AppSettings["UserPassword"].ToString();

                //Step 2- Creating A Connection String.
                ServicePointManager.SecurityProtocol = SecurityProtocolType.Tls12;
                string conn = @" Url = "+ strEnvironment + @";AuthType=OAuth;UserName=" + strUserKey + @";Password=" + strUserPassword + @";AppId=51f81489-12ee-4a9e-aaae-a2591f45987d;RedirectUri=app://58145B91-0C36-4500-8554-080854F2AC97;RequireNewInstance=True";
                Console.WriteLine("Operating Environment : " + conn);

                //Step 3 - Obtaining CRM Service.
                using (var service = new CrmServiceClient(conn))
                {
                    if (service != null)
                    {
                        Console.WriteLine("-> Connected to Dataverse OK");

                        // Create Record.
                        Entity entAccount= new Entity("account");
                        entAccount["name"] = "Test Account";
                        Guid guidAccountId = service.Create(entAccount);
                        Console.WriteLine("-> Created account = 'Test Account' ...");

                        // Read Record.
                        Entity entRetrievedAccount = service.Retrieve("account", guidAccountId, new ColumnSet("name"));
                        Console.WriteLine("-> Retrieved Account = '" + entRetrievedAccount.Attributes["name"] + "' ...");

                        // Update Record.
                        string strOriginalAccountName = entRetrievedAccount.Attributes["name"].ToString();
                        entRetrievedAccount.Attributes["name"] = "Test Account 2";
                        service.Update(entRetrievedAccount);
                        Entity entRetrievedAccount2 = service.Retrieve("account", guidAccountId, new ColumnSet("name"));
                        Console.WriteLine("-> Updated Account = '" + strOriginalAccountName + " to " + entRetrievedAccount2.Attributes["name"] + "'' ...");

                        // Delete Record.
                        service.Delete("account", guidAccountId);
                        Console.WriteLine("-> Deleted account = '" + entRetrievedAccount2.Attributes["name"] + "' ...");
                    }
                }
            }
            catch (Exception ex)
            {
               Console.WriteLine("Error Occurred : " + ex.Message + "\n" + ex.InnerException.Message);
            }

            Console.WriteLine("\nPress any key to close ...");
            Console.ReadLine();
        }
    }
}
Now create the file Build.bat file using the text content below.
@echo off

set APPNAME=DataverseCRUDProgram
set SRC=source\Program.cs source\AssemblyInfo.cs
set DLLS="Microsoft.Xrm.Sdk.dll","Microsoft.Xrm.Tooling.Connector.dll","System.IO.FileSystem.dll"

csc /target:exe /out:bin/%APPNAME%.exe %SRC% /appconfig:source/Program.exe.config /platform:anycpu /lib:"Bin" /reference:%DLLS%
copy source\Program.exe.config bin\%APPNAME%.exe.config

pause ...
Note that you can obviously replace the batch file with a makefile if you have installed the GNUWIN32 set of tools which contains the make file utility.
And finally, create the file Run.bat file using the text content below.
@echo off
cd bin
DataverseCRUDProgram.exe
cd ..
Compile the Source Code and Run the Console Application
Firstly, compile the source code by running the Build.bat file which will display a command prompt window similar to the following.

If there are any errors with the source code, they will be displayed in the command prompt window.
Next run the Console Application by running the Run.bat file which will display a command prompt window similar to the following.
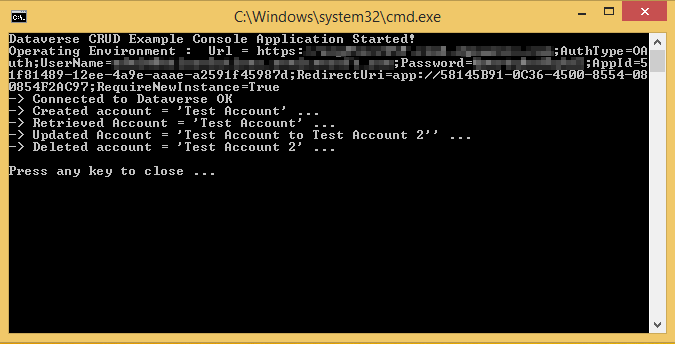
As you can see from above, the Console Application connected to a Dataverse instance and then completed to following operations:
- Created a new Test Account record
- Retrieved the Test Account record just created
- Renamed the Test Account and updated the original record
- Finally deleted the updated Test Account record.
That’s it. You now know how to develop Dataverse Console Applications with out needing Visual Studio installed.
