Have you ever wondered whether it is possible to develop Dynamics 365 CRM Plugins without Visual Studio?
Well in this article, I am going to show you that it is in fact possible.
The steps for developing a CRM Plugin are:
- Download and Install NuGet
- Download and Install .NET Framework 4.6.2
- Create the Source Code Development Folders
- Download and Install the Dynamics 365 CRM SDK Packages
- Create the CRM Plugin Source Code Files
- Compile the Source Code and Create the Plugin DLL
- Upload and Configure the Plugin DLL into CRM
- Test the CRM Plugin.
The sections that follow will provide step by step instructions on how to do this.
Download and Install NuGet
Start by installing the latest command line version of NuGet by going to the following URL.
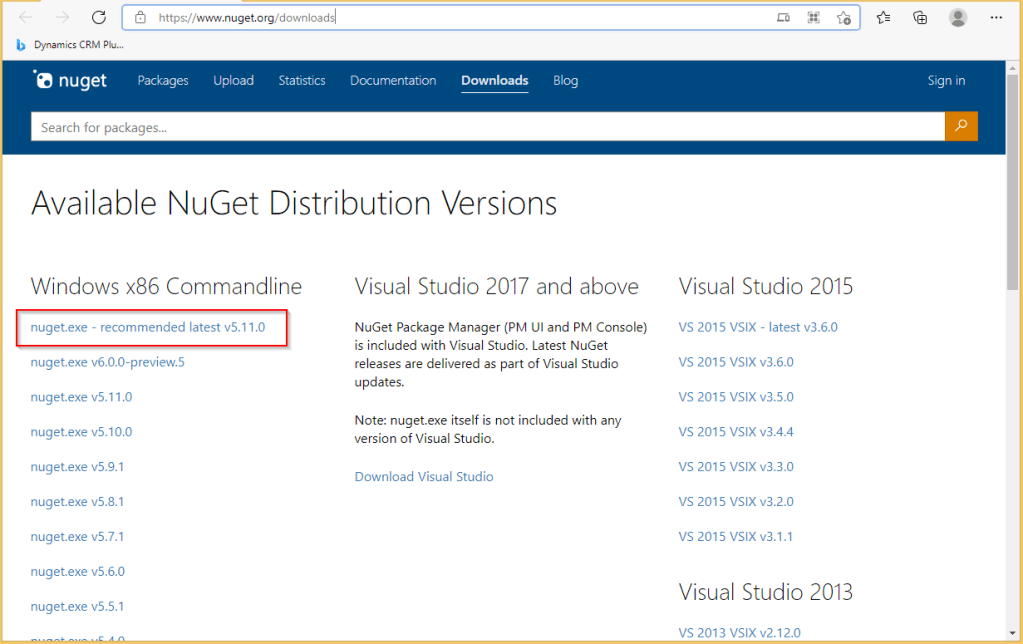
Put the NuGet.exe in a folder that is on the path for the command prompt window.

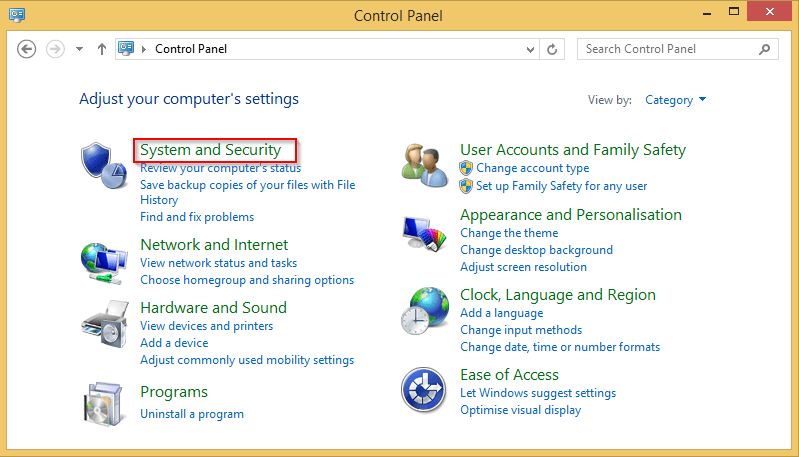
If the above folder is not in your Environment Variables path, that is you cannot run the NuGet.exe application from any folder then go through the following steps to configure this.
Go to your computer’s Control Panel and select System and Security.
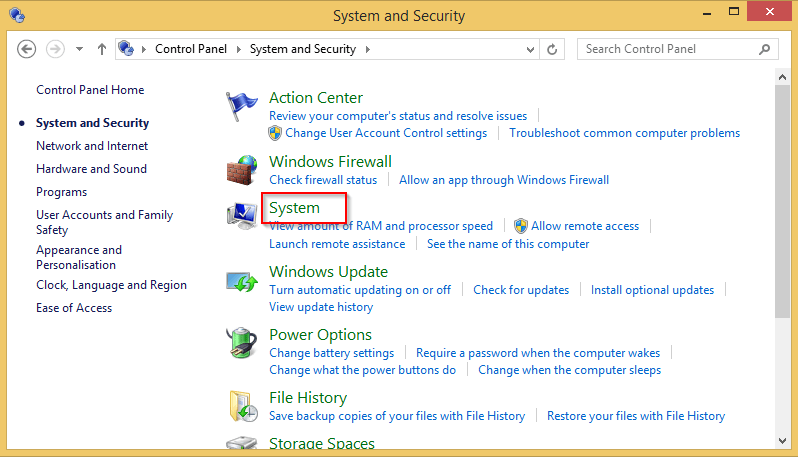
Next select System.
Next select Advanced system settings.

Next select Environment Variables.
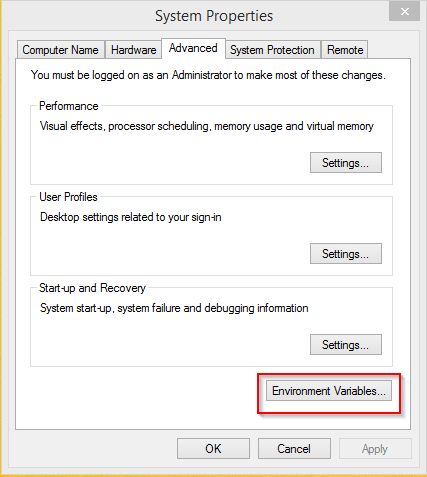
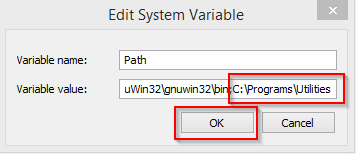
Next select Path followed by the Edit button.
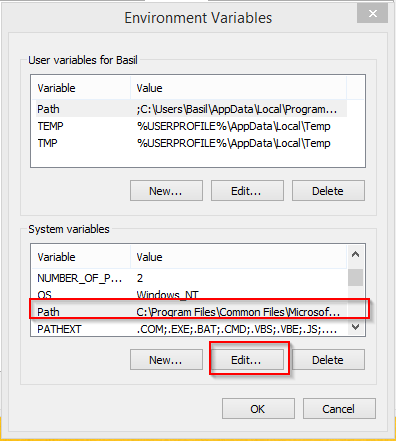
Add the folder path to the Variable Value field and press OK.
When you next open command prompt window, the NuGet.exe can be run from any folder.
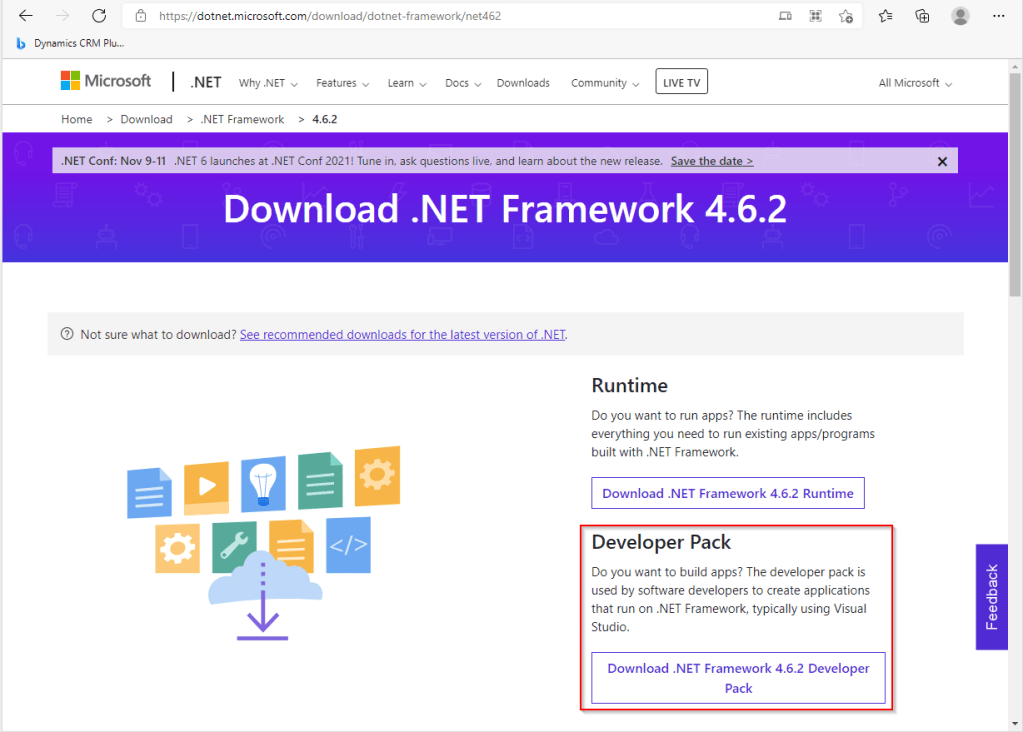
Download and Install .NET Framework 4.6.2
Next install the .NET Framework 4.6.2 by going to the following URL and downloading the Developer Pack.
Download .NET Framework 4.6.2 | Free official downloads (microsoft.com)
Add the following two folder locations to the Path Environment variable using the same steps shown above:
- C:\Windows\Microsoft.NET\Framework\v4.0.30319
- C:\Program Files\Microsoft SDKs\Windows\v10.0A\bin\NETFX 4.6.2 Tools
The next step is to setup the CRM Plugin development folder and get the latest CRM SDK using NuGet.
Create the Source Code Development Folders
Create two sub folders called Packages and Source under a development folder of your choice.

Note that the Packages sub folder is where the CRM SDK will reside whilst the Source sub folder is where CRM Plugin source will reside.
Note that if you wish you can download the zip file below that contains all the folders, sub folders and the C# files that will be described below and will save you time typing.
Download and Install the Dynamics 365 CRM SDK Packages
Open a command prompt window and run the following command.
nuget install Microsoft.CrmSdk.CoreAssemblies -OutputDirectory C:\Development\CRMPlugin_NoVS\Packages
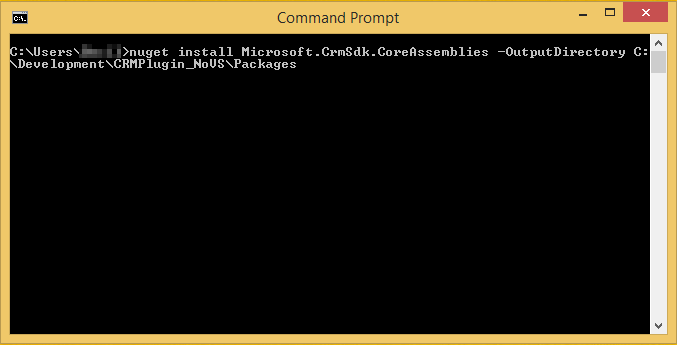
Nuget will retrieve the CRM SDK and copy all the required Sdk packages in the specified folder.

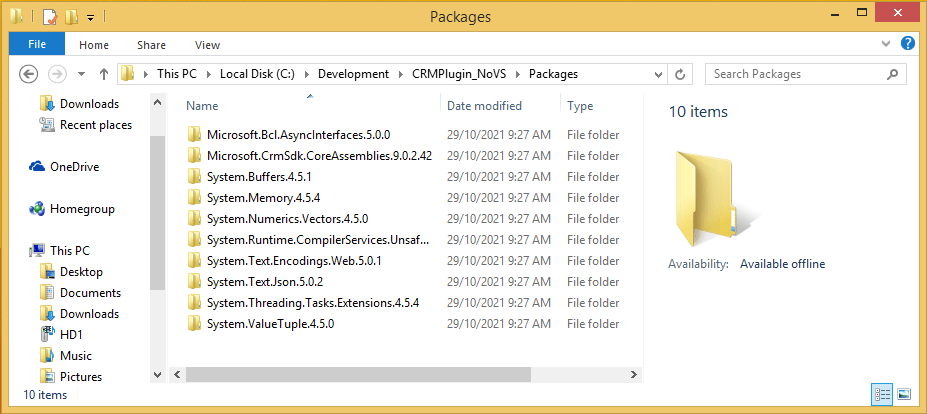
The Packages folder should now contain the following sub folders.
Create the CRM Plugin Source Code Files
Go to the Source and create a new text file called AccountFollowupPlugin.cs using a text editor.

Start by typing in the following code into the AccountFollowupPlugin.cs file.

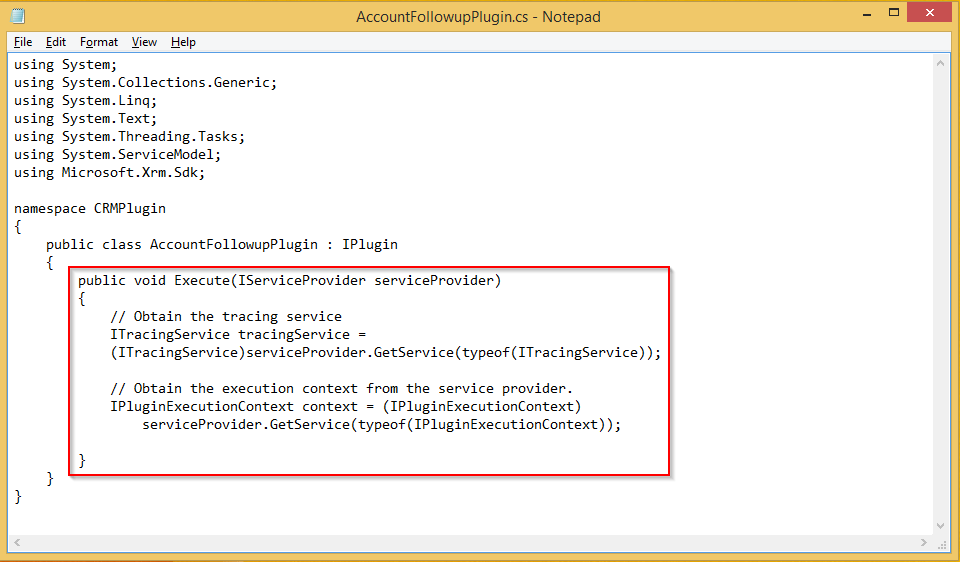
Next type in the following initial code for an Execute function.
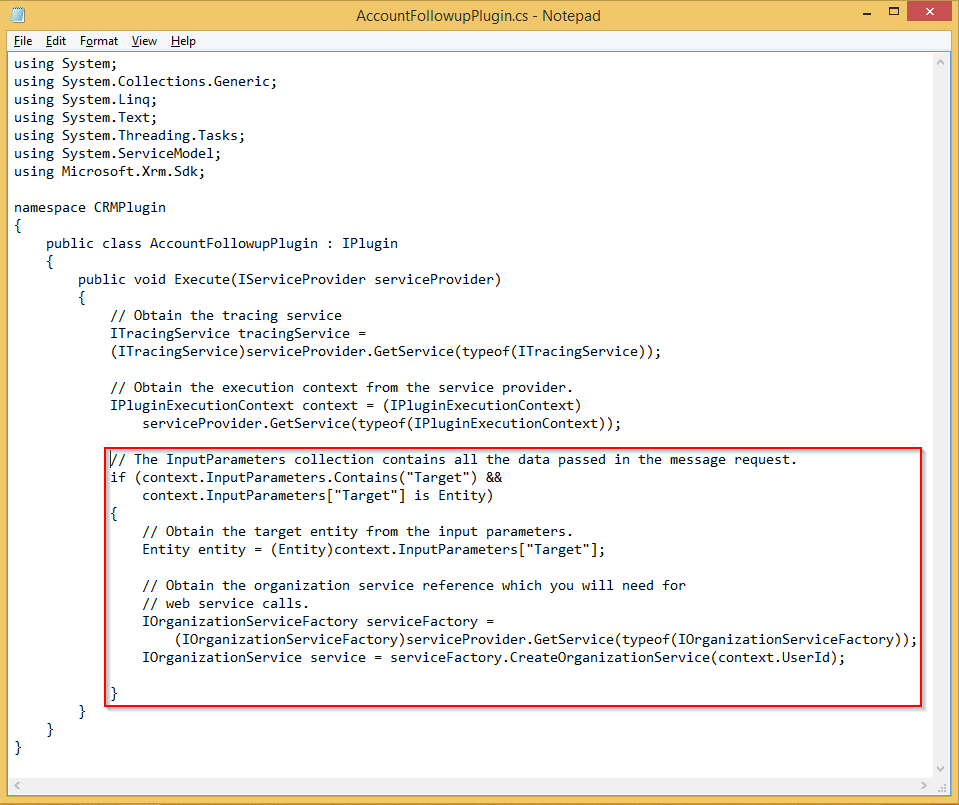
Next type in the following code in the Execute function.
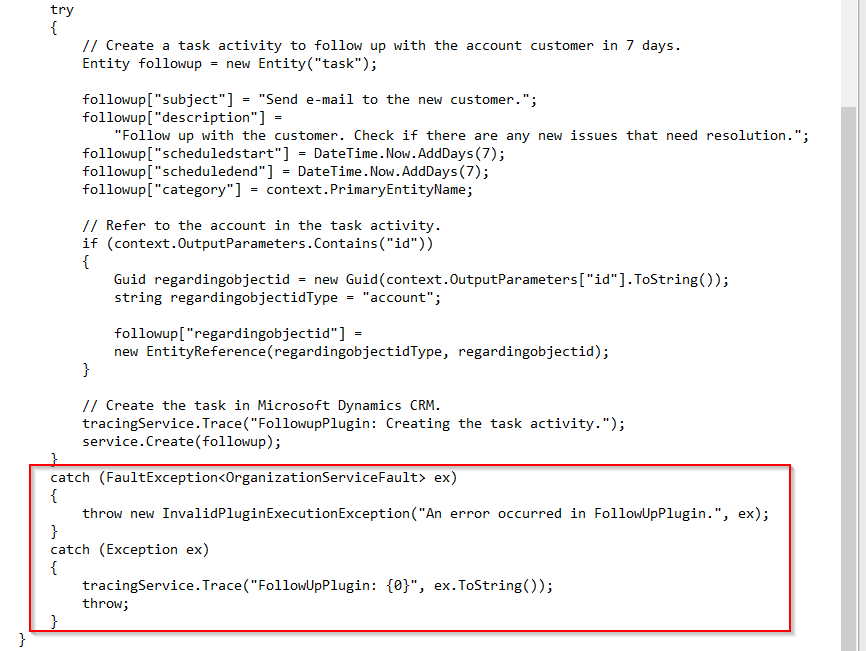
Continue to type in the following code in the Execute function.

And finish by typing in the following code in the Execute function.
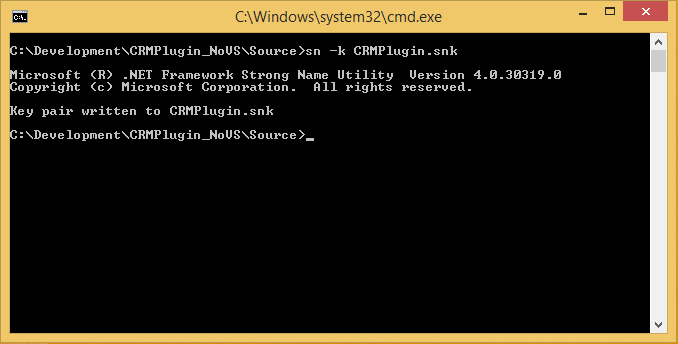
Open a command prompt window in the Source sub folder and run the following command.
sn -k CRMPlugin.snk
Now create a file called app.config in the CRMPlugin folder.

Type in the following content into the app.config file.

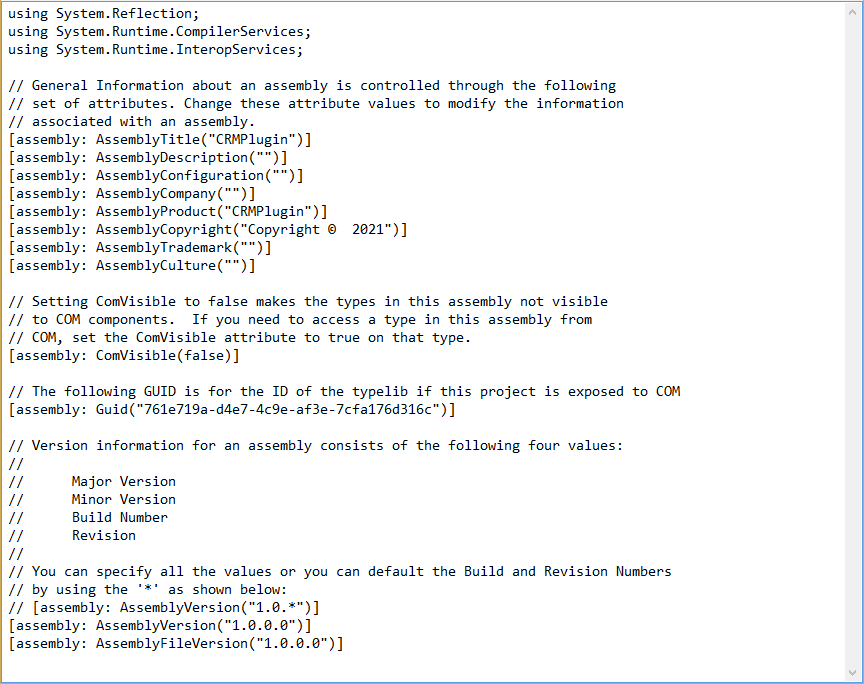
Next create a sub folder called Properties in the CRMPlugin folder and create a file called AssemblyInfo.cs in the Properties sub folder.

Type in the following content into the AssemblyInfo.cs file.
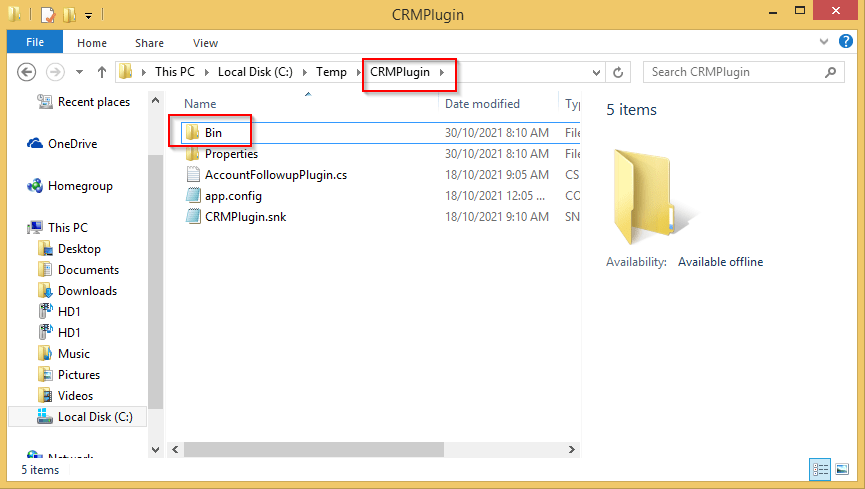
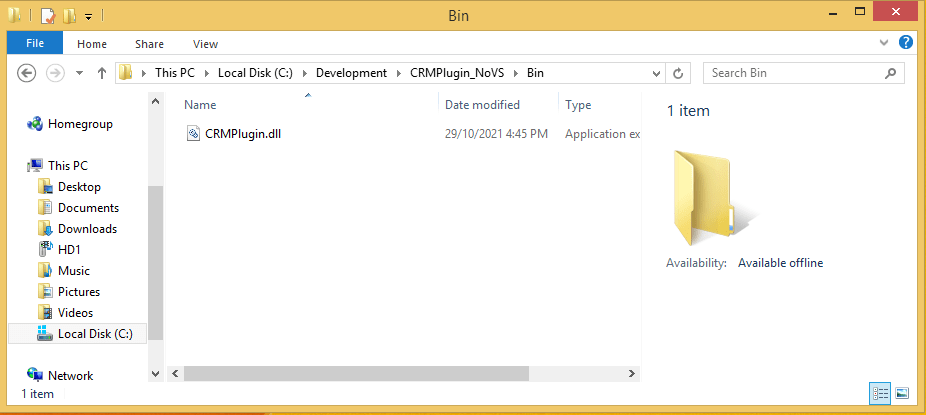
Finally, create a sub folder called Bin in the CRMPlugin folder.
Compile the Source Code and Create the Plugin DLL
Create a new build.bat batch file in the parent folder called CRMPlugin_NoVS and type in the content.

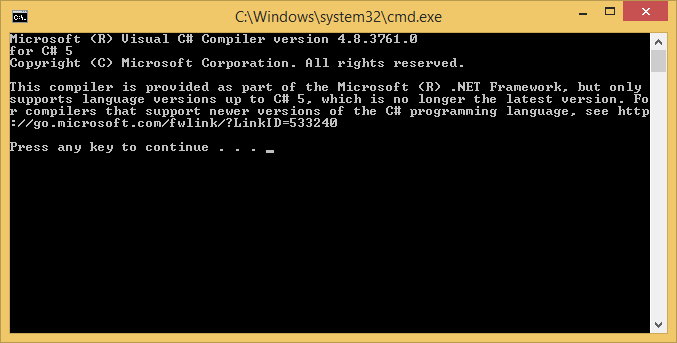
Now run the build.bat which will compile the CRM Plugin code and create CRMPlugin.dll file in the Bin sub folder.
The CRMPlugin.dll file located in the Bin sub folder is shown below. This is the file that can now be uploaded to Dynamics 365 CRM or a Model Driven PowerApps instance using the Plugin Registration Tool that will need to be obtained using NuGet.
Upload and Configure the Plugin DLL into CRM
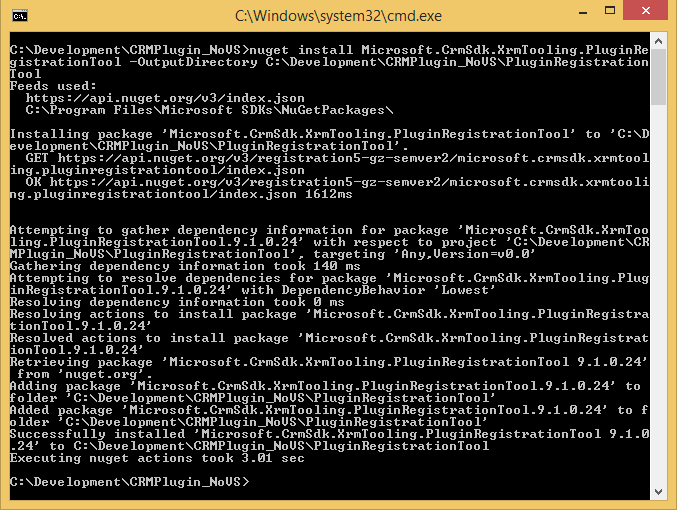
First create a new sub folder called PluginRegistrationTool as shown below.

Next, open a command prompt window and run the following command.
nuget install Microsoft.CrmSdk.XrmTooling.PluginRegistrationTool -OutputDirectory C:\Development\CRMPlugin_NoVS\PluginRegistrationTool
The latest Plugin Registration Tool will now be downloaded and stored in the PluginRegistrationTool sub folder.
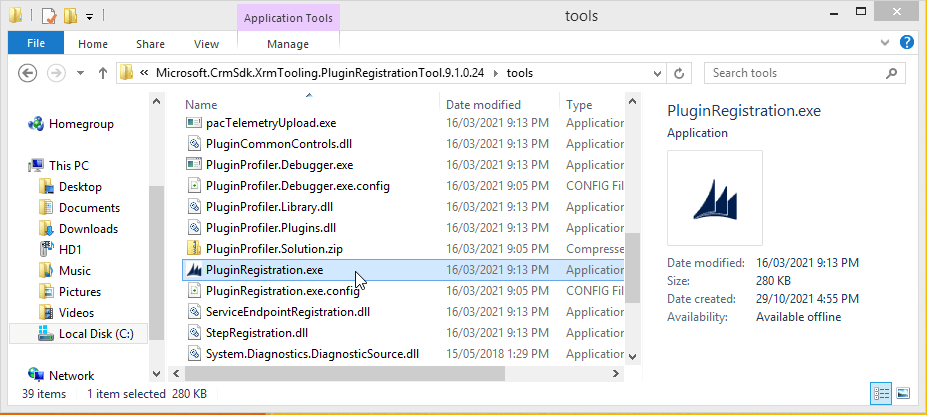
Next, run the Plugin Registration Tool by changing directory to the following tools sub folder and running the PluginRegistration.exe file.
C:\Development\CRMPlugin_NoVS\PluginRegistrationTool\Microsoft.CrmSdk.XrmTooling.PluginRegistrationTool.9.1.0.24\tools
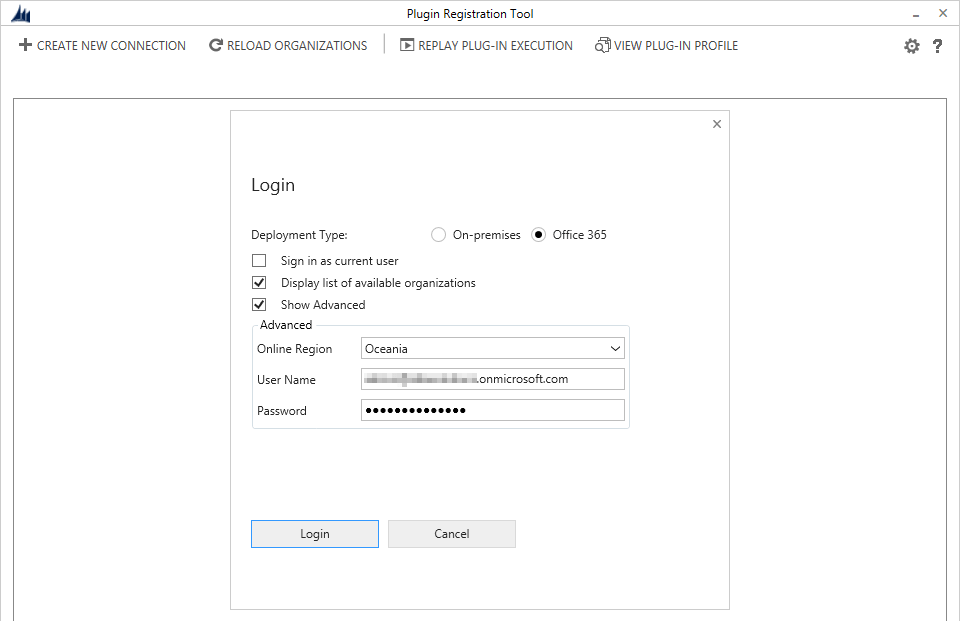
Press the + Create New Connection button.

Log into your Dynamics 365 CRM or Model Driven PowerApps instance.
Select Register followed by Register New Assembly.

Press the … button, select the CRMPlugin.dll file and press Open.
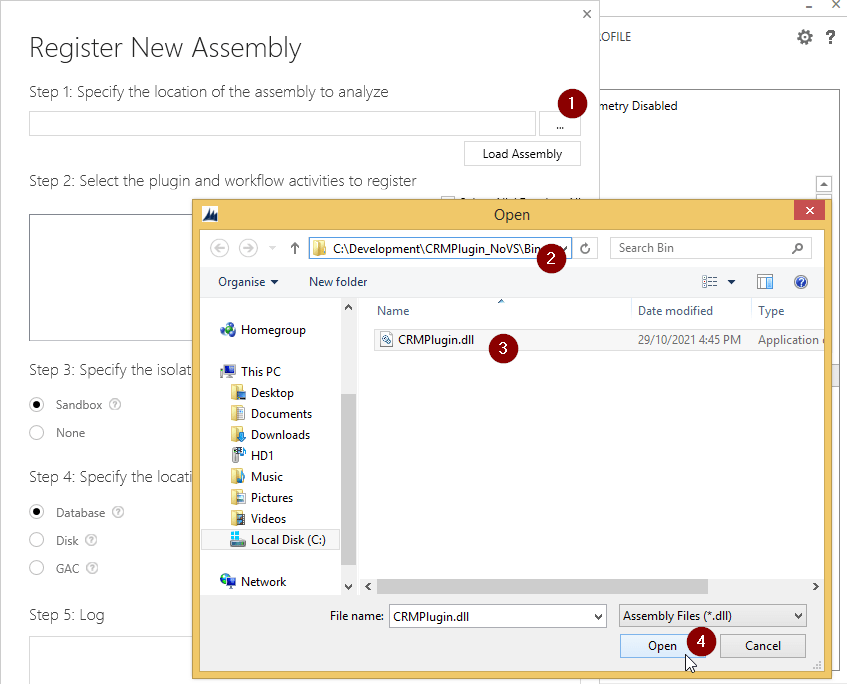
Next press the Register Selected Plugins button.

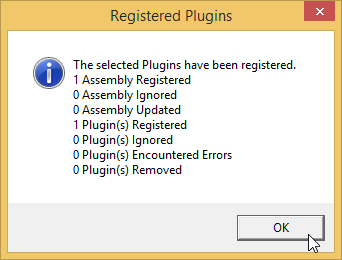
If the Plugin Registration was successful, a popup window similar to that shown below will be displayed.
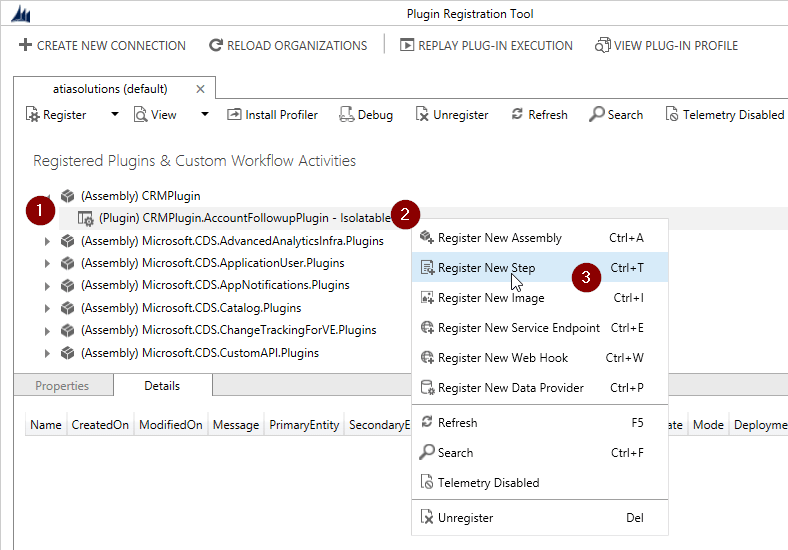
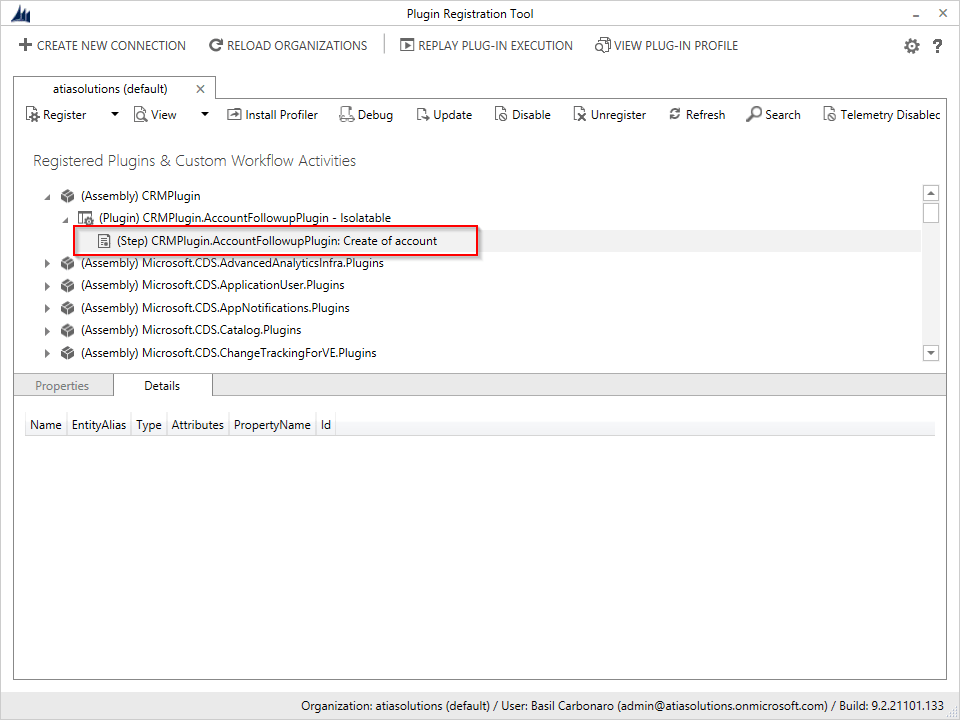
Next expand the (Assembly) CRM Plugin tree item and select the Register New Step menu option from the (Plugin) CRMPlugin.AccountFollowupPlugin – Isolatable entry.
Type Create for Message, account for Primary Entity and none for Secondary Entity. Next select Post Operation for the Event Pipeline Stage of Execution and then press the Register New Step button.
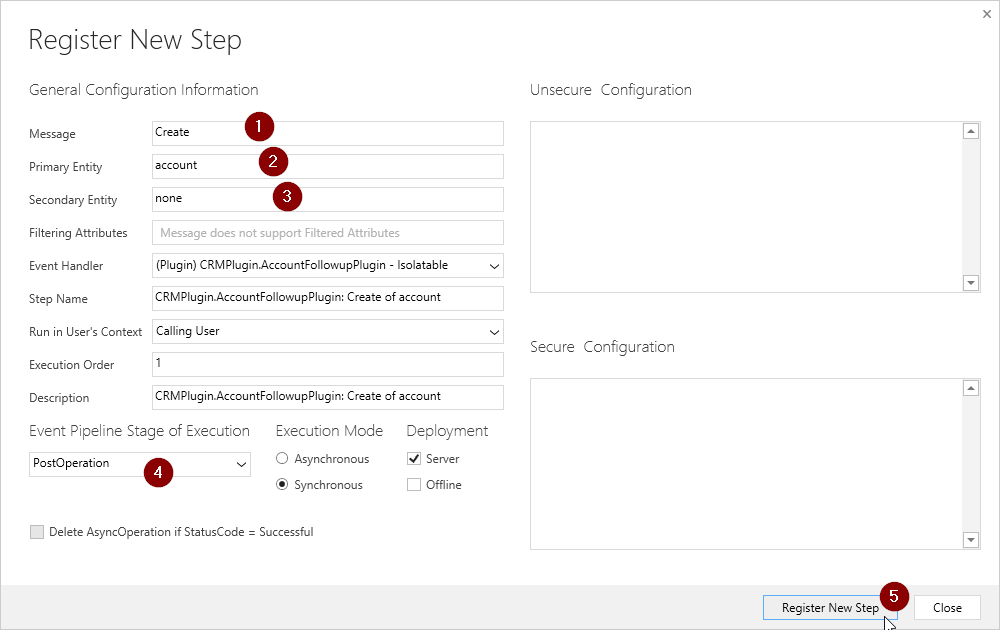
If the new step registration is successful, the new plugin step will be displayed as shown below.
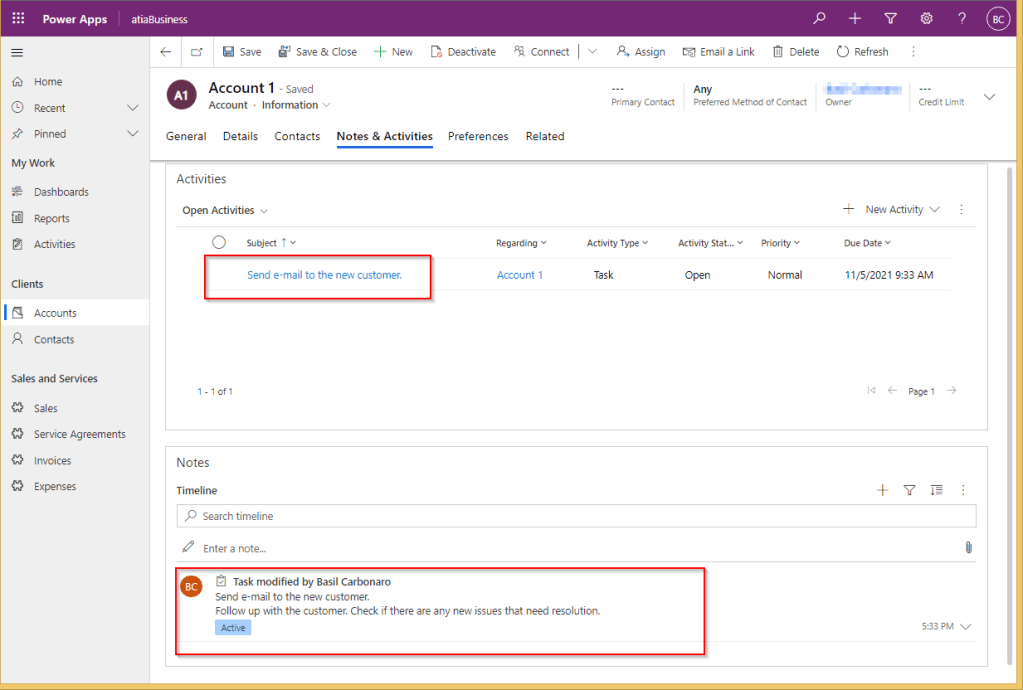
Test the CRM Plugin
You will now be able to create a new Account record and the CRM Plugin step will automatically create a new follow up activity linked to the account as shown below.
So this essentially ends the process of how to develop a CRM Plugin without Visual Studio and deploy it to a Dynamics 365 CRM or Model Driven PowerApps instance.
One final note is that a batch file was used to run the C# Compiler and create the DLL file. If you wish, you use the Make utility to manage your CRM Plugin builds. You can download and install the GnuWin32 utilities which contains the Make utility as one of its many command line applications.
